Monday, August 30, 2010

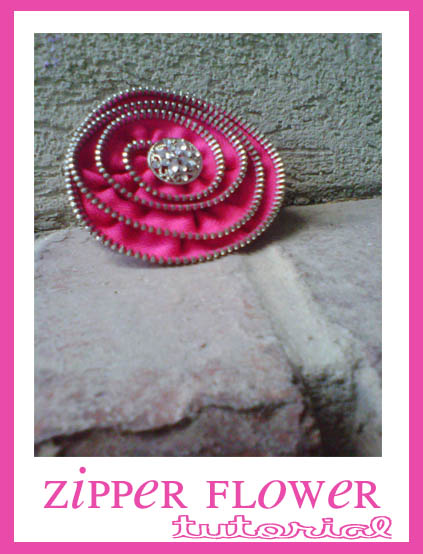
Zipper + flowers..... say whaaaa?


One of my favorite things to do is look through pattern books. I'm one of those that start at the back and work my way to the cover. I scan pictures, visual elements then I'll go back and read lol. Anyhow, several months ago, my sister and I were flipping through and this zipper flower on a cuff.


Start by making a straight stitch along the bottom of your zipper with the teeth up. You can use varying lengths. It does not have to be exact. Mine were probably about 1/4-1/2".

When you get to the end, start pulling on your thread to get it to curl around and ruffle. You can pull with your hands to adjust it how you want.


Finish gathering the edges of the zipper and mold it into a circle


secure the back by sewing stitches through the layers of the zippers.


Add a button or whatever you'd like and your are done.


Thursday, August 26, 2010

Ruffled Enemy


The last couple of dresses, I could sew in a couple of hours. This dress.... almost 2 months! Its been a ruffled mess lol. It was hard for me because of the fabric. Never again. The next time I make a ruffled anything, it will be out of cotton, linen, or knit. I was going to make a companion dress for my 2nd hula girl, but I have decided against it. We'll see if the decision still stands by the end of the week.


I am finally done with this monster of a dress. No pattern, just the trends I see that are "in" right now, and this is my interpretation of it. And yet I'm still not satisfied with it. Maybe I should shorten the top of the skit of the dress. Hmmmmmmm... or maybe I should just leave it alone and call it a day.

Tuesday, August 24, 2010

Family Vinyl Sign


Another family sign that was ordered by my friends mother in law. And yes, I ordered the vinyl at Silly Vinyl Design, my go to gal. Hope you are all enjoying the last days of summer. I have quite a to do list that needs to be completed. Some of the things we're working on here in the lil hula girl hut are; a girls ruffle dress, hair accessories, a couple of quilts and a GIVE AWAY! So keep checking back for details.

Saturday, August 21, 2010

House Warming Gift


I met Audra almost 10 years ago. My hubby DJ'd with her hubby. We clicked. It wasn't because our husbands were friends, but more because she was made from my own heart. We have been friends ever since. We have seen each others children grow up. She is the type of friend you'd want on your side. That ride or die chick, got your back, loyal type of friend. And she has been that for me. Her home has been at times a home away from home for me. With the late night DJ sessions, chat sessions, or kick it sessions. She always welcomes everyone into her home and most of the time is throwin' down in the kitchen, catering to the masses that fill their home. They just recently remodeled their living room and kitchen. It's BEAUTIFUL! This is my little gift to her to remind her just how much I love her. I hope she likes it! *fingers crossed*


I started with a piece of MDF and had it cut down to size. This was the 4th board for this project. Only because I am picky when it comes to the finished product. I'm a bit OCD about it. lol. I had to go down to Home Depot myself and make sure the cuts were right. I use a roller as opposed to the foam brushes. I don''t like the brush strokes, and it covers more area, faster :)

This is the vinyl that Silly Vinyl Design has been working on for me. I can't thank her enough for taking her time on the images I sent her. I think it turned out fabulous! I had to cut out the middle because the medallion is so ornate, I didn't want to risk tearing it.
The finished product!

Wednesday, August 18, 2010

Silly Vinyl Goddess

Seriously.... if you haven't had the pleasure of working with Silia of Silly Vinyl Design, you are missing out! She has been working on some vinyl for me for almost a month! lol!! Only because I'm slow and she seems to be a perfectionist when it comes to her vinyl. LOVE that! I love working w/ people that love what they do. It makes all the difference. And you know, the holidays are coming up... so time to get your orders in!
Today the order was completed and I am so happy that I will have it in my hands soon. It is a housewarming gift for a friend of ours that is so near and dear to my heart. Stay tuned for pics.

Sunday, August 8, 2010

One Pattern....


Remember the Summer Dress post? This is that same pattern, McCall's M6023. I altered the front yolk of the dress. Fabric is a Linen Look. It's heavy and looks more like linen than a blend. AND it was a $1/yard!
I love finding really nice fabric in the Wal-Mart dollar bin. Sometimes I wonder who is pricing these bolts and if they are putting the right bolts in the right place =)
Total price for the dresses, $2 each! Check out Silia's post for her Wal-Mart fabric finds! I love seeing and getting inspiration from what others are creating! I especially have a love for Polynesian handcrafts. Islanders have always been known for their creativity and resourcefulness. One of my newest favorites is Motuliki Create she has some adorable magnet boards and a great tutorial on how to make a really cute candy lei. Check these ladies out!

Besides blog surfing, I need to play catch up but here's a little teaser for an upcoming post.

Friday, July 30, 2010

Watch out now......


It's been a while since I've posted here in the Little Hula Girl. Its been a super busy summer but you always have to make time for a craft right??
Anyhow, I'm sure a lot of you have seen the "interchangeable beaded watch band" craze that has hit Utah. I am always for entrepreneurship and using your talents to pay some bills. But honestly, some of these women are charging outrageous prices just on beads, 4 clasps, and cording. Last November at GNO, I taught my girl friends how to make these "beaded" delights. I love that each band is unique to the maker. And your personality shows through. Some bands were sophisticated, or spunky, colorful, eclectic, modern and earthy. All depends on you. So today I'm giving instructions on the beaded watch band. I should warn you, this can be addicting. So consider yourself warned!


Supplies:

  • Beads
  • 4 lobster clasp
  • 2 spacers/links
  • Watch face
  • Stretch beading cord
  • Scissors
  • Bead board/Felt square.
  • Super glue
1- Pick out your beads. You can buy them at Wal-Mart, Micheal's, JoAnn's, or a specialty store like the Bead Fairy.

2-Using a soft measuring tape measure your wrist. Add 1/2 inch to your measurement for a little extra room on your band and room for the beads. Minus 1 1/2 inches from your above measurement for the watch face, if that's the size you are using. Now you know what your measurement is for the watch band.

Here's an equation that might make it easier
(wr=wrist measurement, wa=watch measurement)
wr + .5 - wa = your watch band size (WBS)

Take the watch band size and
wbs x 2 = how much stretch elastic cord required for the watch band.

3-Cut the elastic cord the measurement figured out in step 2. You might want to add a few extra inches so that you have room to tie knots in the end

4-On a piece of felt or bead board, place your beads in the order that you would like them to be stranded. Make sure to place 1 lobster clasp at each of the 4 corners *tip*make sure when beading the lobster clasp that if you bead them facing up, all 4 have to face up. If you bead them facing down, all 4 have to face down Also do NOT forget the spacers!!

5-Place tape at one end of your elastic stretch cord. This helps so when you are beading it they will not fall off.

6-Start somewhere in the middle of the beads that are placed on your felt piece. Preferably by a big bead, that way you can hide your knot in that bead. Never start on a bead that is next to a lobster clasp. String all the beads onto your stretch elastic cord.

After the beads are strung on, then place another piece of tape at the other end of the cord.

Measure it on your wrist with your watch attached. If it does not fit right then remove or add beads to make it the right size.

7-Now that the band is the right size, tie it as tight as possible in a square knot. *Square knot* right over left (strings) then left over right. Put on a dab of super glue or some other glue that is equivalent. Then do one more tie (right over left) for good luck.

Hold the knots tight for a minute or two to allow the glue to dry. You can always add another drop of glue to seal the deal.

Trim the ends of the string and pull the knot into the big bead.

And you are done!! Now pat yourself on the back! Hooray!